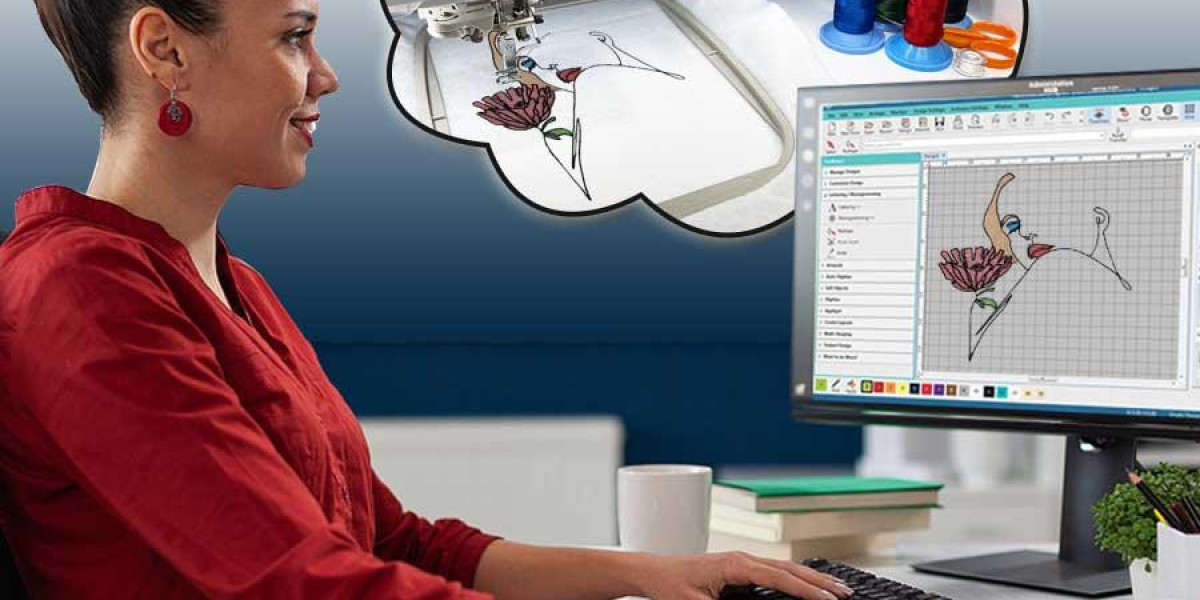
You’ve spent hours perfecting a design in your Brother PE-Design software, meticulously editing stitch types and color sequences. You save your master project as a PXF file, ready for the final step. But then, disaster strikes. The file won't open, your machine won't recognize it, or it stitches out all wrong. If you work with PXF File Embroidery, this frustration is all too common. This specialized Brother project file is the heart of your creative process, but it can sometimes feel like the source of all your technical headaches. Don't let a problematic file derail your project. This guide walks through the most frequent PXF-related issues, explains why they happen, and provides clear, actionable fixes to get you back to stitching.
Introduction: The Double Life of the PXF File
First, let's clear up a major point of confusion: the PXF file is not an embroidery machine file. Think of it as the recipe and the cook's notes, not the finished dish. When you save your work in Brother's PE-Design software as a .PXF, you are saving the complete, editable project. This includes your original imported image, your stitch editing history, your color palette, and your sequencing notes.
Your Brother embroidery machine, however, can't read this complex recipe book. It needs a simple, direct list of instructions—the final dish. That's the .PES file (or .PEC, .DST, etc.) you export from the PXF. Most "PXF problems" are actually misunderstandings of this workflow, issues during the export process, or corruption within the master project file itself. Troubleshooting means figuring out which stage is breaking down.
Common Issue #1: "My Machine Doesn't See the File / 'Incompatible File' Error"
The Problem: You transfer a file to your USB and plug it into your Brother, but the design doesn't appear in the list, or the machine displays an error message.
The Likely Culprits & Fixes:
You're Trying to Use the PXF File Directly.
The Fix: This is the #1 mistake. Your embroidery machine cannot read a .PXF project file. You must open the PXF in PE-Design and use File > Save As to export it in a machine-readable format. For most Brother machines, this is .PES. Select "PES" from the "Save as type" dropdown menu. It's this new .PES file you put on your USB, not the original .PXF.
The Exported Format is Wrong for Your Model.
The Fix: Not all Brother machines use the same format. A newer Innov-is may use .PES, while an older model might need .PEC. An industrial machine might require .DST. Double-check your machine's manual for the exact supported format. When doing "Save As" from your PXF, ensure you're choosing the correct one.
USB Stick Compatibility Issues.
The Fix: Older Brother machines are notoriously picky about USB drives. They often require drives formatted to the FAT32 file system (not exFAT or NTFS, which are common on new drives). Back up your USB stick, then reformat it to FAT32 using your computer's disk management tool. Also, smaller capacity sticks (8GB or 16GB) tend to have fewer issues than larger 128GB drives.
Common Issue #2: "My Design Looks Wrong After Exporting"
The Problem: The design looks perfect on your PE-Design screen, but the exported file has missing elements, changed colors, or odd stitching.
The Likely Culprits & Fixes:
Objects Are Hidden or on a Disabled Layer.
The Fix: PE-Design allows you to hide elements or work on layers for organization. Before exporting, go to your layer panel or object list and make sure every part of your design is visible and enabled. A quick review here can save a failed stitch-out.
Incorrect Export Settings.
The Fix: When you do File > Save As, don't just click save. Click the "Options" or "Settings" button next to the format dropdown. A dialog box will open. Ensure that the export range is set to your entire design and that any "Maximum Stitch" limit is set high enough not to cut off your file. Also, verify the color information is set to export with the design.
Corrupted Color Palette or Thread Table.
The Fix: Sometimes the link between the digital color in the PXF and a physical thread brand gets scrambled. Before exporting, check your color palette in PE-Design. Try re-assigning colors or changing the thread brand setting (e.g., from Madeira to Brother) in the palette options to see if it corrects the preview.
Common Issue #3: "The PXF File is Corrupted or Won't Open"
The Problem: PE-Design crashes when you try to open your PXF, or you get a specific error stating the file is damaged.
The Likely Culprits & Fixes:
Software Version Incompatibility.
The Fix: A PXF file created in a newer version of PE-Design (like version 11) may not open correctly in an older version (like version 8). Check which software version you're using. If you received the file from someone else, ask them to save it down to a compatible version, or export it as a .PES and re-import it into your version to create a new PXF.
Improper Save or System Crash.
The Fix: A computer crash, power outage, or software freeze while the PXF was open can corrupt it. This is why regular, incremental saves are crucial. PE-Design sometimes creates automatic backup files. Look in the folder where your PXF is saved for files with similar names ending in .BAK or .ASD. Try renaming one of these backups to have a .PXF extension and opening it.
The Master File is Beyond Repair.
The Fix: If the file is truly corrupted and you have no backup, your last resort is to go back to an earlier saved version. If you haven't been saving versions, you may need to recreate the design. In the future, use "Save As" frequently to create numbered versions (e.g.,
Project_v1.pxf,Project_v2.pxf). This way, you always have a recent point to return to.
Common Issue #4: "The Design Stitches Poorly (Puckering, Breaks)"
The Problem: The file exports and loads fine, but the physical stitch quality is bad. This points to a problem with the digitizing data saved within the PXF, not the file itself.
The Likely Culprits & Fixes:
Insufficient or Missing Underlay.
The Fix: Open your PXF and examine the stitch properties for large fill areas. Underlay is the foundation. Select the fill object, open the stitch property window, and add a center run, edge run, or zig-zag underlay. This stabilizes the fabric and is essential for preventing puckering, especially on knits or less stable fabrics.
Stitch Density is Too High.
The Fix: Dense designs become stiff, cause thread breaks, and can damage delicate fabrics. Select objects, particularly text fills, and in the properties menu, reduce the stitch density. Increasing the density number (e.g., from 0.40mm to 0.50mm) means fewer stitches per millimeter, resulting in a softer, more flexible design that uses less thread.
Lack of Pull Compensation.
The Fix: When stitches pull on fabric, they can shrink the area they cover, creating gaps between adjacent colors. In your PXF, use the pull compensation tool to slightly overlap adjoining color sections. This compensates for the fabric's pull and creates a seamless, professional look.
Proactive Habits: How to Avoid PXF Problems Before They Start
An ounce of prevention is worth a pound of troubleshooting. Build these habits into your PXF File Embroidery workflow.
Master the Export Chain: Remember the rule: PXF (PE-Design Project) -> Export to .PES (Machine File) -> Transfer to USB -> Load to Machine. Never try to use a PXF on the machine.
Embrace Version Control: Get in the habit of using "Save As" every 30 minutes or after a major change. Name them sequentially:
Logo_Final_1.pxf,Logo_Final_2.pxf. This is your digital safety net.Dedicate a USB Drive: Use one small-capacity, FAT32-formatted USB stick exclusively for your embroidery machine. Label it and don't use it for anything else to avoid formatting errors and file clutter.
The Golden Rule: Always Test Stitch: Before running your final project, stitch the exported .PES file on a scrap piece of your actual project fabric and stabilizer. This catches digitizing errors (density, pull comp) that aren't visible on screen.
Keep Software Updated: Ensure your version of PE-Design is updated with the latest patches from Brother, which often fix known bugs and improve stability.
Conclusion: Taking Control of Your Creative Process
Troubleshooting PXF File Embroidery issues is less about technical genius and more about understanding a logical, step-by-step workflow. Most problems stem from a handful of repeatable missteps: trying to use the wrong file type, overlooking a software setting, or neglecting the foundational rules of good digitizing within the PXF project itself.
By systematically checking your process—from the integrity of your master PXF file to the correctness of your export settings to the compatibility of your transfer media—you can diagnose and fix nearly every common Brother embroidery issue. Remember, the PXF is your creative command center. Treat it with care through regular saves and backups, and it will reliably serve as the foundation for countless successful, stress-free embroidery projects. Now, open up that troublesome project, apply these fixes, and get back to what you love—creating stunning, stitch-perfect designs.